Please, help me to have a real translation sending me an email (to perfectdams(at)gmail.com) with your text. This page was automated translated and it's a bad english. You can translate or write your own text (keeping pictures). In the bottom of the page, it will be write "translated by" with your name and a link through your web site if you want. The french page is always available at the bottom of all pages. I have a lot of pages to translate (Zelda, Mario, Castlevania, Faxanadu,...).
Join the team, send me an email
 Zelda 1 - Walkthrough of dungeon 2 of quest 2 : The A (Zelda I Nes mini)

 Map of Palace "The A" : dungeon 2 of quest 2 of Zelda I (The legend Of Zelda Nes mini)
A little novelty in this palace since one of the walls can be crossed by advancing in it. Otherwise the monsters are known and the keys are numerous. This should not cause you any worries.
Ride and kill all mummies to get a key . Go up again and go right to get the compass by killing the Darknuts.


Turn left, go up up, take the key killing bats if necessary, then go up again. Go up again by killing or not the mummies. In the room at Kesse, make a hole right to recover a key then come back, kill them all and go up through the door that opens.


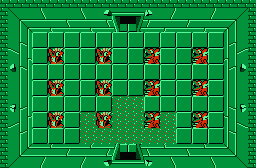
Kill Manhandla and get the key then go right. Rise without killing the Darknuts and then kill the Zols to get the map. Go down 2 times to find yourself in a corridor. You can walk through the bottom wall keeping the direction towards the wall pressed down. In the room where you arrive take the stairs to get the whistle (flute). Go down to A6 (2 times above the start with 3 Zols) and go right.


Avoid the Darknuts and make a hole on the right. Kill all the Keeses to get a key then go down. Kill the 3 Zols to open the door and get a key . In the next room, take the stairs, avoiding the mummies who only bring 5 rubies if you kill them. Do not kill the Darknuts (unless you need bombs) and go up to face the boss.


The boss is a Gleeok with 2 heads, it is a big dragon with 2 heads. If you have all your hearts, just get out of the door after a ball has passed, and shoot until it shoots. At that moment, enter a little in the door to hide you. If you do not have all your heart, the task will prove more arduous (especially if like me you did not follow my advice and arrive with the wooden sword). Try to avoid the balls of the Gleeok and tap it to the head during the short resorts it leaves you. Try to alternate heads so that the second one dies quickly enough after the first (because it flies away and becomes very boring when you "kill" it). On the video, I have the wooden sword, I have not followed all the instructions but you will see the technique to follow if you have all your hearts.


| A | B | C | |
| 1 |  |
||
| 2 |  |
 |
 |
| 3 |  |
 |
 |
| 4 |  |
 |
 |
| 5 |  |
 |
 |
| 6 |  |
 |
 |
| 7 |  |
 |
|
| 8 |  |
 |
Keys : H7, A5, B3, A2, C6, C7
Map : B1
Compass : B6
Whistle : B4
 You are ready to continue adventure..
Here a save(a ".sav" of 8 Ko).

| Back home of The adventure of Zelda |
| Back to the Nintendo Nes home |
- Version Française -- English version -
